Body Cameras for Cycling: Chest vs. Helmet Mounting
Compare actual riding views, mount security and recording needs before choosing a camera position.
Editorial guidance, not legal advice or a model-specific performance promise. Check the rules and requirements that apply to your location and use.
Neither mounting position is automatically right. Compare the complete setup in a controlled test; a practice ride is not an impact-safety certification.
READ BEFORE TESTING Start with the suitability checks. Do not use a trial to validate an improvised helmet attachment, and do not interact with the camera while riding.
All figures are conceptual. Field-of-view shapes are not measured angles or model-specific performance results. Worksheet blanks are intended for your own observations.
Start with the ride, not the mount
Neither the chest nor the helmet is automatically the right place for a cycling camera. Test a chest mount when you want a torso-centered view that works with your riding position. Consider a helmet mount only when the specific helmet, camera, and attachment are suitable for that use—and a view that moves with your head serves your purpose.
For consistent road coverage, include a properly supported bike-mounted arrangement in the comparison. Do not restrict the decision to two wearable positions when the real requirement is recording ahead and behind.
The practical question is:
“What does the saved video show while I ride normally, and can the setup capture it without compromising my helmet, control of the bicycle, or attention?”
Start with riding safety. NHTSA emphasizes proper helmet fit, a working bicycle, visibility, and avoiding distractions. A camera is an additional recording tool, not a replacement for those basics or a guarantee against a collision. [1]
This guide focuses on adult cycling, especially commuting and road recording. It provides mounting checks, a controlled comparison, and a pre-ride checklist—not a product ranking, an impact-safety certification, or a report of hands-on testing.
Decide Whether You Want Ride Highlights or a Road Record
Two purposes call for different tests.
For ride highlights, you may want selected moments, a view of the handlebars, and footage suitable for editing. For a record of the journey, you may need the sequence leading up to an event, uninterrupted capture during the relevant period, and a reliable way to preserve original files.
A scenic clip that looks excellent does not demonstrate that the equipment captured an entire commute. Conversely, a functional journey record does not need to resemble an edited action-sports video.

Write down the task before choosing a position. For example:
“I want permitted recordings of my commute, including the road ahead and the approach of traffic from behind. I need to retrieve the relevant files after arriving, without operating the camera while riding.”
That is a hypothetical requirement, not a reason everyone should record every journey. It immediately raises a coverage question: can one lens capture both required directions at the same time?
Our companion Body Camera vs. Action Camera: Which Should You Choose? compares equipment categories. Here, evaluate where a suitable camera goes and what the complete riding setup records.
Chest, Helmet, and Bike Mounts: Compare the Actual View
Use this worksheet to investigate each position rather than treating a mounting label as a performance guarantee.
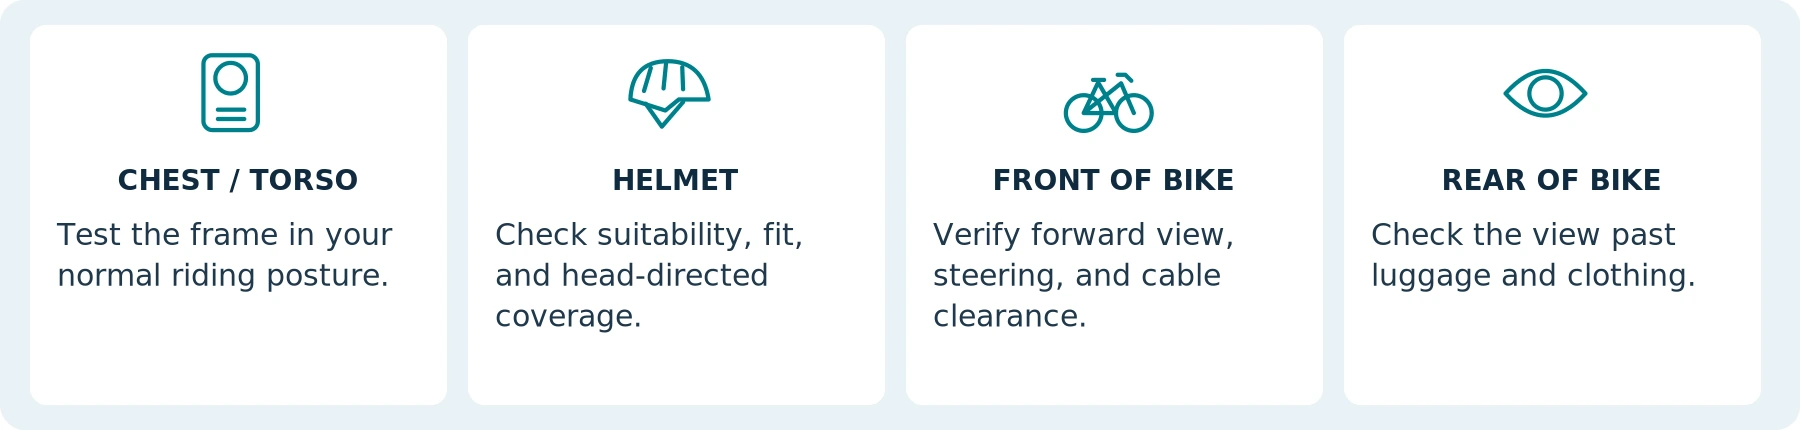
| Mounting option | What to examine | The question that can change your decision |
|---|---|---|
| Chest or torso | The view in your normal riding posture, including arms, jacket, and bag straps. | Does leaning forward hide the road or point the camera at the bicycle? |
| Helmet | The permitted mounting arrangement and the view during ordinary head movements. | Does the scene you need leave the frame when you look elsewhere? |
| Front of the bicycle | Supported attachment, steering movement, road vibration, and clearance from bags and cables. | Does it provide the forward view you need without relying on body position? |
| Rear of the bicycle | Supported attachment and the view past luggage, clothing, mudguards, and other equipment. | Can it show approaching traffic without obstruction during the actual ride? |
A head-mounted camera is not an eye tracker, and a torso-mounted camera does not follow your gaze. Work through those mechanical differences in a stationary test before judging either setup on a ride.
Also distinguish a clip attached to a jersey from a chest harness. Test the particular combination of fabric, attachment, and camera weight; do not assume both will behave alike.
Stationary view check
| Candidate setup | What the saved frame includes / misses |
|---|---|
| Chest or torso | |
| Helmet, only if suitable | |
| Bike-mounted alternative |
Planning worksheet. Fill with observations from a permitted test; do not enter a real address or route.
Check Helmet Suitability Before Comparing Video Quality
“The camera fits the bracket” does not establish that the bracket is appropriate for your helmet. Obtain the helmet maker’s instructions for the exact model, then check the camera and mount instructions together.
Giro’s current helmet FAQ warns against modifying a helmet because this may compromise safety. GoPro’s helmet-mount information separately tells users to follow the helmet manufacturer’s safe-use instructions. Neither supports treating a generic adhesive pad or strap as universal helmet approval. [2][3]
![Compatibility requires the complete combination to be suitable. Follow the relevant manufacturers’ instructions. [1][2][3]](https://spikecam.com/wp-content/uploads/spikecam-knowledge/b08/figure-04.webp)
Ask the manufacturer whether your proposed attachment, position, and complete camera weight are supported. Where an approved mount has a release feature, use it as designed; do not strengthen, bypass, or tether it in a way the instructions do not permit.
Do not drill the shell, cut the liner, relocate retention straps, or apply unapproved adhesives or solvents to make an attachment work. Do not tilt a correctly fitted helmet backward to improve the camera angle. Adjust only the approved camera arrangement; helmet fit comes first. [1][2][3]
If suitability remains unresolved, leave the camera off that helmet and assess another position. A seller’s photograph, an anecdote from another rider, or a successful short ride is not an impact-safety test.
Chest mounting needs scrutiny too. Check comfort, movement, and interference with protective equipment. This guide does not claim that carrying a hard device on the chest is impact-safe or safer than every helmet arrangement. For organized rides or competition, check the organizer’s equipment rules separately.
Document the suitability check
| Item | Exact model / instruction / confirmation |
|---|---|
| Helmet and fit | |
| Camera, full load, and attachment | |
| Unresolved restriction or alternative |
Chest Mounting: Set the Angle in Your Riding Position
Begin with the bicycle securely supported or with an appropriate helper, in a permitted area away from traffic. Put on the clothing, backpack, and helmet you intend to use.
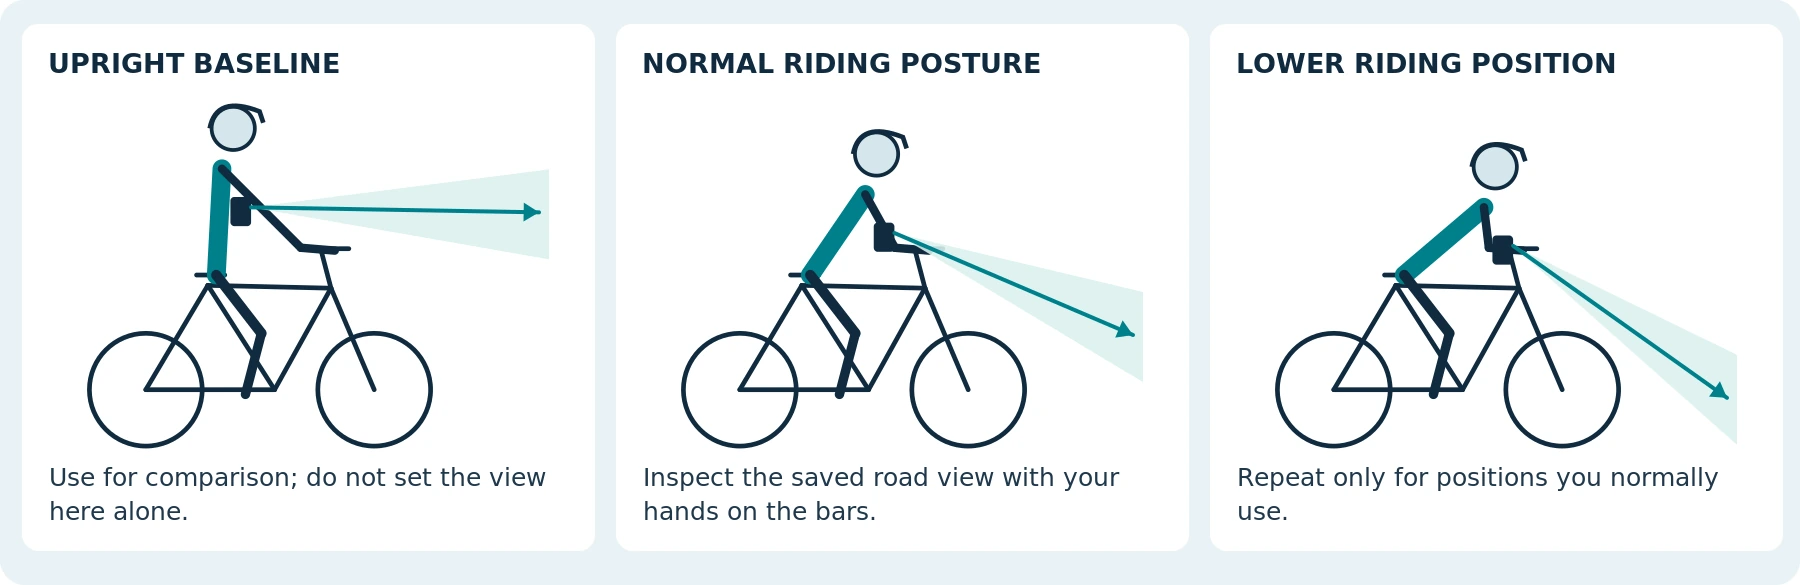
Check the view while sitting normally, leaning forward, and moving between the hand positions you actually use. On a drop-bar bicycle, include the upper brake-lever grips—the hoods—and the lower curved bars, or drops, where these are part of your normal riding.
Do not aim the camera solely while standing upright beside the bicycle. Inspect saved clips from the riding positions instead. Ask whether they include the road, relevant side context, and traffic-signal area, or mainly the top tube, knees, and arms.
A Fictional Fit Test
Imagine that a camera looks level while its wearer stands. In the rider’s usual forward-leaning position, the training recording shows mostly handlebars and pavement. The rider adjusts the supported camera angle while stopped and repeats the exercise.
That example illustrates why posture matters; it is not a measured result or a recommended universal angle. The appropriate position depends on the rider, bicycle, mount, lens, and recording mode.
Repeat the check after zipping a jacket, tightening a backpack strap, or adding wet-weather clothing. Test ordinary breathing, reaching for the brakes, and controlled changes between sitting and standing. Reject a setup that requires an awkward posture or interferes with steering and braking.
A smoother sample is not enough when the important action is outside the frame. Choose the arrangement that works with your normal riding—not a riding posture invented for the camera.
Posture and clothing notes
| Normal posture / clothing | View or control issue observed |
|---|---|
Helmet Mounting: A Different Perspective, Not Continuous Coverage Everywhere
Once compatibility and fit are established, examine the view during ordinary head movements. In a stationary exercise, look ahead, toward a side marker, and over your shoulder as appropriate. Review what each movement brings into and takes out of the frame.
A helmet view may show a side interaction that a forward-facing torso view misses. It can also look away from an event ahead at the moment you check somewhere else. Treat these as coverage trade-offs, not proof that either position always captures more useful material.
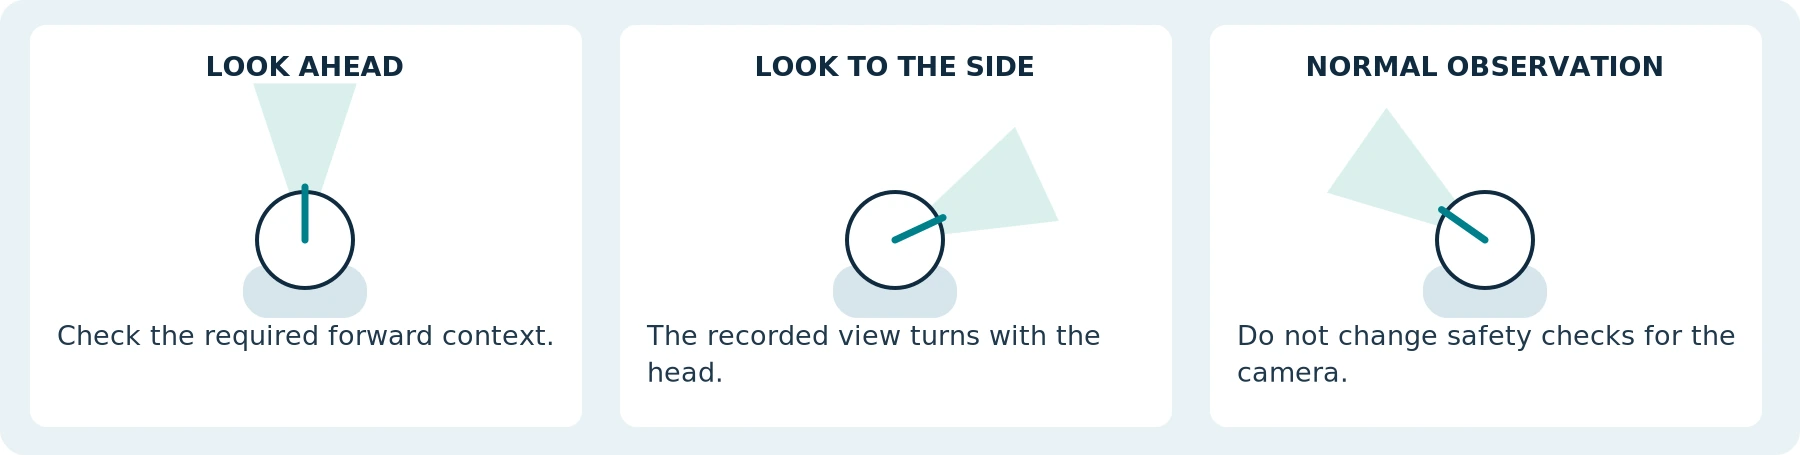
Do not hold your head still for the video or turn farther to chase a vehicle with the lens. NHTSA advises cyclists to look over their shoulder before changing lane position or turning. Preserve the observations needed for riding; let the recording reflect normal safe behavior. [1]
Check clearance, comfort, and stability for the intended duration. Stop if the arrangement shifts the helmet, restricts movement, or distracts you. Reassess it rather than compensating with a tighter-than-appropriate fit or another improvised attachment.
During setup, practise recording confirmation while stationary. Do not rely on reaching toward the helmet or watching a phone preview while moving. A helmet camera should not require you to become its operator throughout the ride.
Observe normally; review afterward
| Stationary exercise | View limitation to record |
|---|---|
| Look ahead | |
| Normal side / rear observation | |
| Clothing, eyewear, or comfort change |
Do You Need Separate Front and Rear Recording?
Front and rear coverage is a separate decision from chest versus helmet mounting. One forward-facing lens does not supply a continuous rear view. Looking back occasionally is not the same as recording the approach behind you throughout a relevant period.
For a proposed two-camera arrangement, inspect both saved views. The rear camera needs a usable line past the actual luggage and clothing. The forward camera needs a useful frame when the bicycle steers and when the rider changes position.
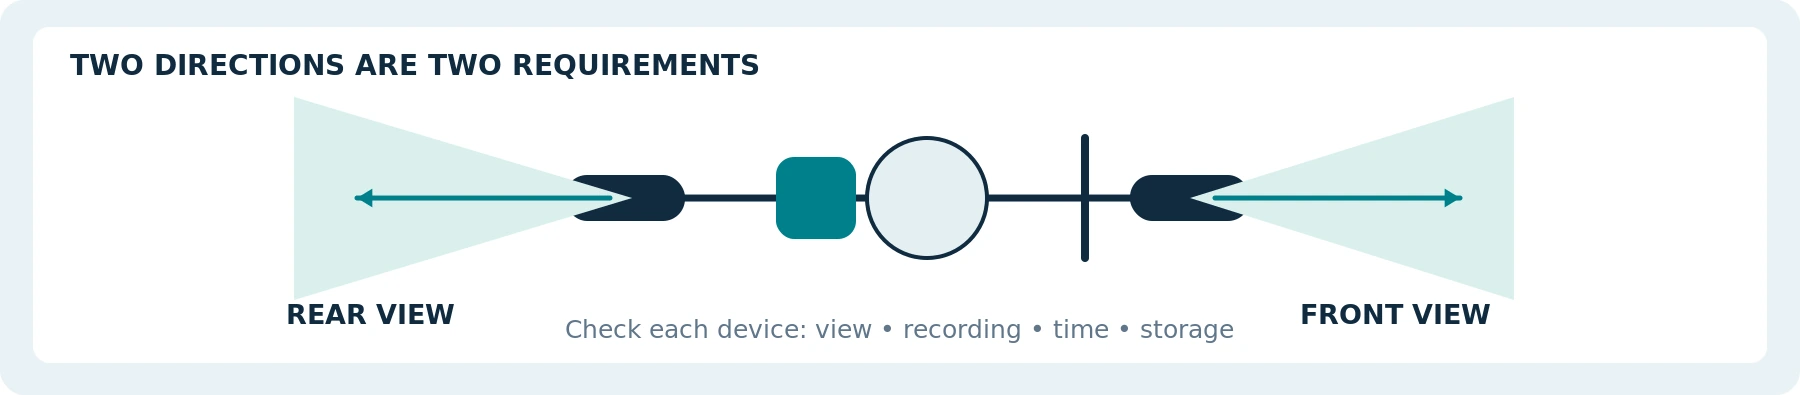
Check each camera’s recording state, power, clock, and storage. Two cameras do not automatically produce synchronized or equally complete files. During a controlled test, show an agreed visual marker to both where practical, or document the clocks and any discrepancy before comparing events.
A bike-mounted option can avoid adding equipment to a helmet, but it still needs a supported installation. Cycliq’s Fly12 Sport mounting guide specifies its handlebar arrangement and recording orientation. Use such instructions for the exact device; do not copy another product’s clamp, tightening, or tether instructions onto your bicycle. [4]
Check steering, braking, cable movement, wheel clearance, lights, and reflectors before riding. A camera accessory should not displace equipment required for visibility. NHTSA’s guidance includes front and rear lighting and reflectors for darkness or poor visibility. [1]
Keep a rear camera distinct from a mirror, a warning system, or a shoulder check. Saving a picture for later does not mean you are receiving timely information about approaching traffic.
Verify each source separately
| Source | View / time check | Recording and storage status |
|---|---|---|
| Forward view | ||
| Rear view, when required |
Will It Capture Usable Moving Detail or License Plates?
Evaluate original footage from the relevant positions and lighting—not a resolution badge.
Axis explains that a slow shutter speed can leave a stationary scene looking sharp while blurring a moving vehicle’s plate. Frame rate and the exposure time of each frame are different settings. More frames per second do not, by themselves, guarantee readable moving detail. [5]
For a permitted test, use a consenting helper and fictional text markers at representative distances. Review the road context as well as readable detail. Do not arrange a dangerous close pass or approach an unwilling driver to test recognition.
![Schematic capture and crop boundaries, not real camera footage or a stated crop percentage. Recheck the recorded frame after mode changes. [5][6]](https://spikecam.com/wp-content/uploads/spikecam-knowledge/b08/figure-08.webp)
Where supported, compare appropriate 1080p and higher-resolution modes at the same mounting position. Judge the saved information, required operating time, and storage together. Do not make “4K at 60 fps” an automatic requirement—or assume that every lower-resolution option is sufficient.
Stabilization Can Change the Frame
DJI documents that RockSteady stabilization on Osmo Action 5 Pro compensates partly by cropping image edges. That is a specific example of why the selected stabilization mode matters to coverage. [6]
Recheck the saved frame after changing stabilization, field of view, aspect ratio, or horizon settings. A preview from a different mode may not show the final boundaries. Look for the context you need at the edges, rather than rewarding smoothness alone.
For a close-passing report, describe your observation and supply the relevant footage. Do not attach a precise distance or speed merely because a wide-angle image looks close or a graphical overlay can be added. Distinguish an estimate from a measurement made using an appropriate method; leave unsupported numerical claims out of the report.
COMPARE LIKE WITH LIKE Keep mounting position and settings comparable. When cameras or conditions differ, label the results as a comparison of complete setups rather than mount position alone.
Night Riding, Wind, and Rain Need Separate Checks
A daytime test does not answer whether an evening commute will be recorded usefully. Repeat the permitted comparison with normal movement and the lighting you actually expect, without choosing a hazardous location to make the test harder. Axis specifically recommends validating image performance with both expected motion and relevant lighting. [5]

Ask what the camera’s night mode actually does. Do not assume infrared illumination, available-light enhancement, and a visible bicycle headlight serve the same purpose. Verify the camera’s function without sacrificing the bicycle’s required visibility equipment.
Where sound is necessary and permitted, test the exported audio while stationary and after a controlled moving exercise. Check wind, clothing contact, mount noise, and any supported noise-reduction setting. Clear narration in a quiet room does not pass the on-bike audio test.
Do not make voice control your only dependable activation method without testing it. DJI, for example, recommends a relatively quiet environment and close range for its documented voice-control function. [6]
For wet conditions, inspect the manufacturer’s port-cover and charging instructions. DJI’s water-use instructions for Osmo Action 5 Pro require the relevant covers to be closed; that illustrates why recording from an exposed charging connection needs its own compatibility check. [6]
Only use supported power and accessory arrangements. Avoid loose cables between your head, body, and bicycle, and stop somewhere safe before checking or cleaning a lens. A successful water-resistance claim does not establish that a rain-covered image remains useful.
Condition notes for a controlled test
| Condition / configuration | Saved result or required follow-up |
|---|---|
| Representative evening light | |
| Permitted audio and wind conditions | |
| Rain / port-cover / power instructions |
Can It Record the Whole Intended Ride?
Define elapsed recording time, not only the time your cycling computer counts as moving. Decide how permitted stops, the outward journey, and the return journey fit into the plan.
As a hypothetical planning example, a 35-minute outbound recording and a 50-minute return recording require 85 minutes of saved coverage. A long interval between them raises a separate question: will the camera be off, ready, or buffering? This arithmetic is not a runtime claim for any model.

Test the selected resolution, stabilization, connectivity, and lighting together. For example, Cycliq’s Fly12 Sport battery guidance distinguishes camera-only runtime from runtime with its light enabled. Its separate footage guidance says enabling stabilization reduces operating time. Do not compare the longest camera-only figure with a configuration that also powers the light. [7][8]
A spare battery can help when your route permits a safe planned stop, but changing it does not provide uninterrupted footage from that camera. Confirm recording-while-powered separately; do not assume an available USB socket settles the question.
A low-power mode may also change which functions continue. Ask what happens to the recording—not just whether some indicator or light remains on.
Continuous Capture, Loop Recording, and Pre-Recording Are Different
For a lawful requirement to record the relevant journey continuously, verify normal video mode and actual continuity. Do not assume movement-triggered recording, selected highlight clips, or time-lapse will retain the same sequence.
Loop recording concerns reuse of storage. Cycliq’s Fly12 Sport troubleshooting page explains that older files can be overwritten and that retention before looping depends on settings and locked files. Battery life and the amount of old footage still retained are separate limits. [8]
Check adjacent files for gaps and learn what happens when protected storage fills. For a model offering pre-event capture, verify when its buffer is running and what it saves; it cannot recover an earlier event it never captured.
An automatic incident feature also needs an explanation: what triggers it, which clips are protected, and whether recording subsequently stops. Do not simulate a crash or damage equipment to test it. A file lock or trigger is not a verified backup.
Preserve a Road Incident Before the Next Ride
First get somewhere safe and obtain any necessary assistance. Do not follow a vehicle, prolong an argument, or alter your route to obtain better evidence. North Yorkshire Police’s Operation Snap guidance specifically asks for footage captured during ordinary activity rather than going out searching for offences. [9]
Once safe, note the relevant time, location, travel direction, and what you directly observed. Use the supported method to preserve pertinent files from each camera, including necessary lead-up and aftermath. Do not immediately format the card or start another long recording over the material.
Keep original files or documented native exports unchanged and verify an independent protected copy. Create any permitted excerpt, annotation, or redaction separately. Do not replace the source with a social-media compilation or AI-generated detail presented as capture.

Record late starts, obstructed views, missing sound, and clock errors honestly. A rear clip ending early and a front clip continuing are two different records; do not assemble them into an apparently seamless sequence without explaining the gap.
Follow the Recipient’s Actual Submission Rules
Check the relevant police force, insurer, or other authorized recipient promptly. Required context, formats, statements, and deadlines vary; a camera manufacturer’s sharing feature is not an official reporting process.
For a specific UK example, North Yorkshire Police’s Operation Snap page asks for reports within 10 days, original unedited footage, and surrounding context. It directs collisions to a separate route. Those are that force’s published requirements, not a UK-wide or international deadline. Follow its current instructions rather than treating this summary as the submission form. [9]
Do not publish footage to pressure someone or crowdsource an identity. The same force warns against posting incident material before or during police or court action. Keep private reporting separate from public sharing, and do not promise yourself a particular enforcement or insurance outcome. [9]
For broader incident-log and preservation methods, see Using a Body Camera to Document Harassment and Neighbor Disputes. Do not treat an ordinary riding record as permission to investigate other road users.
Check Recording Rules and Your Own Privacy
Assess video, conversations, and disclosure separately, along with rules for the premises, transport, or organized event you enter. A recording device does not expand your riding rights or remove other people’s privacy interests.

United States: check the applicable state and circumstances. California Penal Code section 632 addresses confidential communications and all-party consent, with qualifications about confidentiality. It does not create one rule for every interaction in every state. [10]
United Kingdom: the ICO says its organizational surveillance guidance excludes purely personal or household processing. That distinction does not settle whether every commuter’s recording pattern qualifies, and the page is marked as under review. [11]
European Union: the EDPB gives an example of a downhill cyclist recording in a remote area for personal entertainment at home within the household exemption. It also interprets that exemption narrowly and distinguishes publication to an indefinite audience. Do not extend that particular recreational example automatically to systematic road recording or public posting; check national requirements too. [12]
Plan where recording stops before entering a home, workplace, changing room, or other sensitive setting. Review buffers and audio as well as the main recording control. Obtain qualified local advice for uncertain uses; this article does not determine legal compliance or admissibility.
Protect your own information when sharing: a full ride can expose an address, regular route, location overlay, and routine. Use appropriate private submission channels for relevant incidents and separately assess any recreational publication. Keep only recordings you have an ongoing reason or obligation to retain.
KEEP THE REQUEST PRIVATE For product advice, describe the technical task. Do not send a home address, complete daily route, or private incident recording.
Run a Controlled Chest-versus-Helmet Comparison
Only test mounting configurations whose suitability has been established. A riding trial cannot certify an improvised helmet attachment as safe.
Start stationary, then use a permitted, traffic-free practice area with consenting participants. Do not stage a close pass, emergency maneuver, crash, or confrontation. Set the camera before moving and inspect it only after stopping.
To isolate mounting position, use the same camera and settings on separate runs where both arrangements are supported. Record changes in light and conditions. Comparing different cameras also changes the sensor, processing, and lens, so the result is a comparison of complete setups—not mounting position alone.
This is a proposed test method, not a published performance result.
| Test | Chest-mount check | Helmet-mount check |
|---|---|---|
| Normal riding posture | Inspect the view upright, leaning forward, and in normal hand positions. | Verify helmet fit stays correct and the required scene appears without changing head posture for filming. |
| Ordinary observation | Check what remains outside the frame when looking sideways or behind. | Check what leaves the forward frame during normal head movements. |
| Clothing and equipment | Test jacket, bag straps, and normal arm movement. | Test the approved arrangement with eyewear and other compatible equipment; check clearance and movement. |
| Road context and detail | Review relevant markers and a consenting participant in saved files. | Repeat with comparable settings and conditions; note frame edges and motion. |
| Operating period | Test the intended readiness and recording pattern, comfort, and warnings. | Repeat without sacrificing helmet fit, comfort, or attention. |
| Retrieval and preservation | Find a specified practice moment, open adjoining files, and verify a backup. | Repeat; document any different settings, timestamps, or missing context. |
Mark essentials Pass, Fail, or Unverified. A successful short clip does not pass a full-duration requirement. Extra resolution or an attractive angle should not cancel out interference with safe riding or a missing required view.
Repeat relevant checks after changes to the helmet, mount, bicycle, clothing, firmware, or recording mode. If neither wearable position meets the requirements, evaluate a supported bike-mounted option or keep using equipment that already works.
Use the worksheet in this guide to record your own results. Pass / Fail / Unverified applies to recording requirements, not crash protection.
Your Pre-Ride Camera Check Card
Use this alongside—not instead of—your bicycle and helmet checks.
| Check while stopped | Confirm before moving |
|---|---|
| Fit and attachment | The approved mount is secure, the helmet fits correctly, and no equipment interferes with control, observation, lights, or reflectors. |
| Lens and framing | The lens is clean; the saved view has been checked in riding posture with the actual clothing and luggage. |
| Power and storage | Enough resources are available for the intended outward and return use; important older files have been preserved. |
| Mode, audio, and time | The permitted recording configuration, clock, time zone, and any buffering are understood. |
| Recording and stopping | You recognize the recording confirmation, know where capture should stop, and will not adjust the camera while riding. |
After returning, confirm capture has ended, check relevant files, and prepare the next use. If equipment develops a problem on the ride, stop somewhere appropriate before dealing with it. Never turn a failed recording into a reason to repeat a risky encounter.
Describe Your Requirements Before Buying
For a recommendation or quote, provide the country or region, bicycle and usual posture, intended coverage, ride duration, lighting, clothing, and current equipment. For a helmet proposal, include the exact helmet and approved mounting information—not simply “fits GoPro.”
A useful inquiry could be:
I need [permitted ride recording or selected clips] during [ride duration], using [bicycle type and normal posture]. I want to capture [front, rear, or a specific task]. My current equipment is [existing camera and mount]. Please confirm the supported attachment, actual recording mode, operating-time conditions, storage behavior, and export method for the proposed model.
Compare the additional cost of a complete setup: necessary mounts, storage, power arrangements, transfer equipment, software or services, and support. Do not count a required but unquoted accessory as free. The A-series subscription and budget guides cover those checks in detail.
Do not send a home address, complete daily route, or private incident footage for an initial product inquiry.
The decision: choose the complete setup
Choose a cycling camera position by mounting suitability, actual riding posture, and the saved view—not by the category name or the most dramatic sample clip.
A chest mount is worth testing when a torso-centered view meets the task. A helmet mount deserves consideration only with a suitable approved arrangement and a genuine reason to use a head-directed view. For consistent forward and rear recording, evaluate supported bike-mounted coverage separately.
Test movement, night conditions, the full operating period, and file retrieval. Preserve normal observation and bicycle control even when that means the camera misses something.
When asking about a SpikeCam model, request confirmation for the exact camera and accessories. This guide does not certify helmet compatibility, crash safety, readable license plates, waterproof charging, automatic incident capture, or any other unverified capability.
Keep riding safely. Let the camera fit the ride—not the other way around.
Your cycling-camera requirements
Fill in the task, not a private route. Use “Unverified” until the necessary information or test result is available.
| Requirement | Your notes |
|---|---|
| Purpose and required view | |
| Bicycle, posture, clothing, and luggage | |
| Helmet / supported mount, if relevant | |
| Duration, modes, audio, and conditions | |
| File access, backup, and complete budget |
WORKSHEET / B08
Controlled comparison and file-verification record
For a permitted, traffic-free test with consenting participants. Test only suitable configurations. No crash, close-pass, or confrontation exercise is required.
| Setup information | Record before testing |
|---|---|
| Test date / reviewer / general location | |
| Camera / firmware / settings | |
| Mount / helmet approval information | |
| Clothing / bicycle / conditions / duration |
Record what passed, failed, or remains unverified
| Essential requirement | Chest setup | Helmet or alternative setup |
|---|---|---|
| Normal posture and view | ||
| Observation / control / comfort | ||
| Activation, stopping, and sound | ||
| Operating period and file continuity | ||
| Retrieval and independent backup |
Decision and follow-up
| Keep / adjust / reject / pause | Unresolved requirement or next test |
|---|---|
Keep original test filenames, any clock differences, and changes between runs. Results establish only the tested recording behavior—not helmet impact safety, collision prevention, or legal acceptance.
SOURCE NOTES / B08
Reference sources
Sources and check date retained from the supplied manuscript: September 26, 2026. Product examples apply to the cited models and instructions.
1. NHTSA — Bicycle Safety. Helmet fit, equipment, attention, shoulder checks, and cycling preparation. Official guidance ↗
2. Giro — FAQs, Helmet FAQs section. Current manufacturer warning against helmet modification. Official FAQ ↗
3. GoPro — Helmet Front + Side Mount. Product-specific notice to follow the helmet manufacturer's safe-use instructions. Official product instructions ↗
4. Cycliq — Mounting your Fly12 Sport. Device-specific handlebar mounting and recording orientation. Official support guide ↗
5. Axis — Troubleshooting guide for image quality. Exposure, movement, motion blur, and validation under relevant conditions. Official technical guidance ↗
6. DJI — Osmo Action 5 Pro FAQ. Stabilization crop, voice-control conditions, and water-use requirements; examples apply to this product. Official FAQ ↗
7. Cycliq — Fly12 Sport Battery Issues. Published operating-time differences by light and video settings; not a result from this guide. Official support guide ↗
8. Cycliq — Fly12 Sport Footage Issues. Stabilization power trade-off, loop overwrite, protected footage, and file retrieval. Official support guide ↗
9. North Yorkshire Police — Operation Snap. Local submission criteria, original footage, context, public posting, and separate collision reporting. Official reporting guidance ↗
10. California Legislative Information — Penal Code section 632. Confidential-communication provisions; not a nationwide rule or case-specific legal conclusion. Official statute ↗
11. ICO — What does this guidance address? Scope of organizational surveillance guidance and personal/household processing. Marked under review when checked. Official guidance ↗
12. EDPB — Guidelines 3/2019 on processing of personal data through video devices, version 2.1. Section 2.3, pages 7–8: household exemption, recreational cycling example, and public publication. Official PDF ↗
Editorial scope and illustration notes
Sources checked September 26, 2026. Named manufacturers illustrate documented instructions or capabilities, not product rankings, installation approvals for other products, or hands-on results. The comparison, posture example, timing calculation, and checklists are editorial tools. A practice ride is not an impact or protective-equipment test. UK, EU, California, and local police references retain their stated scope; the cited ICO page is marked as under review. No legal outcome, collision prevention, helmet-camera combination, or unverified SpikeCam feature is certified by this article.
Figures are conceptual illustrations, not photographs of tested products or approved installations. Diagrams are not to scale. Added worksheet fields are editable planning tools and not official forms.
Related articles
Using a Body Camera to Document Harassment and Neighbor Disputes
Put safety first and consider appropriate ways to document incidents without escalating a dispute.
Body Cameras for Hospitality and Event Staff: What to Consider
Assess selected roles, venue conditions, recording boundaries and a reliable handover of footage.
Body Camera Buying Guide: How to Choose the Right One
Choose a camera around recording controls, battery life, file access and your actual working routine.